
Yogurt takes a little bit of time to make. Not actual working time but time for it to sit and culture. Yogurt is a cultured product, much like cheese. It is a very easy and economical to make.
Before you begin there are a few things to make sure you have on hand and a few things to know and understand about the process. Most of what you need you will be able to find in the grocery store.
You need to begin with starter yogurt. Starter yogurt is yogurt that has been made with active live cultures; this is the friendly bacteria that will turn your milk into yogurt. You can buy a small container of yogurt at the grocery to use for this purpose. Make sure that the container says Made with live cultures or something of this nature. You want to buy plain yogurt, not flavored. Each time you make yogurt you will need some starter. You can use your own starter, but over time it looses its potency and your yogurt will not turn out. So I always begin with store bought yogurt. You can freeze your starter yogurt in ice cube trays so that it is convenient to have on hand.
As far as tools for making yogurt go, you will need a thermometer. A candy thermometer bought from the grocery store will work just fine. You will need a large pot to heat up your milk and then something to incubate your yogurt for about 12 hours. The temperature of the yogurt must stay between 90 and 110 degrees during this incubation time.
There are a variety of ways of maintaining this temperature. If you have a gas stove, putting your yogurt in the stove and leaving the pilot light on may be enough. Make sure you have a thermometer in the oven so you can keep an eye on the temperatures. If you have a stove that you can set at around 100 degrees, this works also. Another method that works is to use a small styrofoam ice chest. While you are making the yogurt fill up the ice chest with hot tap water. Right before you set the jars in the ice chest empty the water, place filled jars in the ice chest, and fill with 110 degree water up to the bottom edge of the lids. Put the cover on and place a blanket over this. After about 4 hours check to make sure the water is still the right temperature (between 90-110 degrees). If the water is cooling down, dump half of it out and replace with 110 degree water and cover again. Check every 1 1/2 hours or so to make sure the water is staying warm. If the temperature of your yogurt gets to high or to low then it will kill the culture. So it is important that during the incubation period that your temperature stays between 90 and 110 degrees.
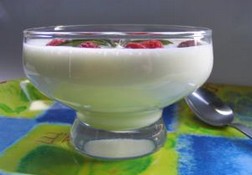
 Homemade Yoghurtby Crystal Miller - 8 cups milk, cow or goat (I raise Nubian goats and use my own goat milk most often, but have made lots of yogurt with ordinary milk from the store) - 1/3 cup powdered milk (this is optional but will make a thicker yogurt) - 1/4 cup pure maple syrup, optional for sweetened yogurt - 1/2 cup starter yogurt Before you begin wash 2 quart-sized canning jars. If you want to use 4 pint-sized jars instead that would be fine too. Have the metal rings and lids ready to cover the jars when you are done. Pour your milk into a large cooking pot. Heat the milk up to 185 degrees. Allow the milk to cool down to 110 degrees. The cooling can take a long time. If you want to speed the process up fill your sink with cold water and place the pot of hot milk in the water and stir and stir. The temperature drops fairly quickly this way, so make sure to have your thermometer handy to keep checking. After you reach 110 degrees add the remaining ingredients and stir until everything is dissolved very well. Pour this mixture into your ready and waiting jars. Put the lids on and put them into what ever place you are planning to incubate and culture them. Leave them there for 10 to 12 hours. Try not to disturb the jars to much. When the yogurt is firm it is time to remove them and put them in the refrigerator to get nice and cold. Usually 12 to 24 hours. If you make and incubate the yogurt during the day it can refrigerate overnight and be ready for breakfast the next day. If you would like flavored yogurt, just add fresh cut up fruit or a little bit of flavored jam when you are serving your yogurt. |  Yogurt (oven style)Alternative method of yogurt making Makes 1/2 gallon 1/2 gallon milk (I use fat free) 2 cups instant dry milk powder 1 cup sugar or your choice of sweetener 1 Tablespoon good vanilla (I use Mexican) 1 6-8 oz. container yogurt with active cultures (first batch after that save some of your own) Thermometer Large, heavy, pot Electric stove with light or gas stove with non-auto pilot light. Can also use a heating pad/towel/and box to cover) Place milk in pot and add dry milk powder. Stir well. Heat milk to 180 degrees, stirring now and then so bottom doesn't burn Fill sink with ice cold water and place pot insde sink, Add sugar and stir well. Cool down to 110-115 degrees. Add vanilla. Add yogurt and stir well. Fill containers of your choice and seal. ( I use jelly canning jars) Place on cookie sheet or heat proof tray. Heat oven to 110-115 and turn off. Turn on oven light. Place yogurt in oven on upper rack and check oven periodically to make sure it stays between 110-115. Yogurt will be "done" in 4-6 hours but you can let it incubate for up to 12 depending on how tart you like it and how much beneficial bacteria you wish it to have. Serve plain or with any kind of fruit. Suggestions: Top with sliced bananas, peach or cherry pie filling, or stir in plain vanilla. |
No comments:
Post a Comment