Showing posts with label Homemade Eatables. Show all posts

Tuesday, June 15, 2010

Home Beauty Tips

Everyone wants to look their best and as beautiful as they can. Many of us spend a lot of money on branded beauty products and on numerous visits to the beauty parlor. There are a number of simple beauty treatments that we can use with things that are easily available in our homes. Here are a few home beauty tips that you can try using things from the kitchen without any extra cost.
  • To remove puffiness from the eyelids, massage a drop of very fresh castor oil on to them.
  • To cool your eyes, make eye pads using thick slices of cucumber. Another option is to use cotton pads soaked in cold milk. Lie down and place them on your closed eyes and relax for a while.
  • Putting a drop of rose water into each eye just before you sleep can also refresh you eyes.
  • To prevent your lips from chapping, use hot water fermentation on your lips and then apply a mixture of vaseline and honey. Apply this mixture about three times a week.
  • To prevent your lips from drying you can use a ground mixture or rose petals and milk butter.
  • To delay age spots on your hand, use a piece of lemon and rub all over your hand, before washing. This will delay onset of age-spots.
  • If you have no time to shampoo your hair before going out, then brush 1 tablespoon of talcum powder or corn flour through your hair. Try this out first when you are not in hurry to make sure that it works the way you want.
  • To prevent hair loss you should have a biotin rich drink. Blend bananas with honey, yogurt and low fat milk. Drink this for a few weeks.
  • While blow drying and setting your hair, blow-dry at hot on the roots of the hair. Roll your hair inwards or outwards at the ends. To improve the setting make sure the ends are evenly rolled in or rolled out. Heat the hair for a second and then let it cool. This process of setting the hair will last longer and make your hair look beautiful.
  • To condition your hair, after shampooing your hair take some conditioner on your palm and rub it with both hands. Apply from the hair shaft moving downwards. Do not apply on your scalp. Rinse your hair after 5 minutes.
  • To add extra shine and glow to your hair add 2 tablespoons of malt vinegar. Use it as a last rinse and towel dry your hair.

How to make your own homemade "pop tarts"

Poptarts

Ok, these are not pop-tarts exactly, how about just-like-pop-tarts-but-without-the-stuff-you-can't-spell (or say)? It's super easy, all you need is a good butter pie dough and delicious jam of your choice. And if you're one of those who think a great pie is all about a good crust--I am of course one--these pop-tarts are perfect for you. They are filled with just enough delectable jam to punctuate the flavor without obscuring the buttery, flaky goodness of the crust.

I've been having so much fun making them (and eating them) lately, I thought I'd share a few tricks I picked up along the way with you so your pop-tarts come out perfect every time. Like this one in the picture just below--a "pop-tart" filled with homemade Reine Claude plums and vanilla beans--which I polished off in three seconds flat right in front of Lulu's at the Octagon in Santa Cruz.

Poptartwithreineclaudejam

Start with the pie crust recipe you're most comfortable with. If you haven't got one, you can check out Pie Crust 101 over at Deb's Smitten Kitchen, or Shuna's very thorough post on pies, or even Ms.Martha herself.

Dough

Break off a piece about 75g by weight. Flour the pastry board or your counter top well.

Rolling

Roll the dough into 8"x6" rectangle, working gently and slowly so you get a good rectangular shape.

Rolled8x6

Brush off excess flour. It's generally a good idea from this point on to place the dough sheet onto a piece of parchment paper so it can be moved pretty easily.

Filljam

Pick your favorite jam from your cupboard and spread it generously on to one side of the dough, leaving about an inch margin on three sides. I like to use jams that are a little bit on the thicker side, as they tend to be more intense and can easily be pressed in between two sheets of dough.

Fold

Fold the dough in half, making sure they match the other edge perfectly. Press down along the edges to seal the dough pocket. If your dough had trouble sticking together, try dipping your fingertip into a bit of water and wipe it along the inside of the seam, then press the dough down again to seal.

Pressed

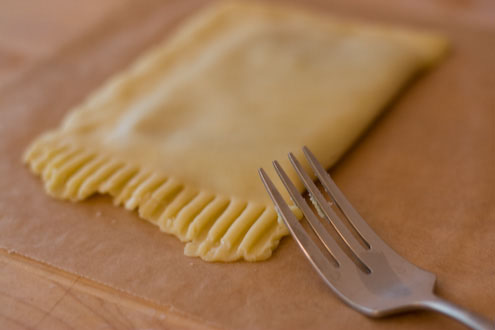
Take a fork and use the tines to press the dough together, creating a nice pattern around all the edges but the folding seam.

Trim

Trim off the excess, uneven dough edges. I use a pastry scraper, but you can easily use a kitchen knife.

Eggwashed

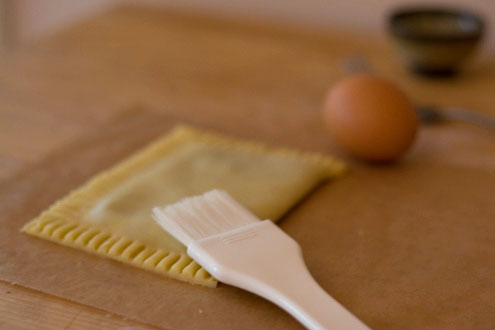
Brush the top with egg wash and sprinkle raw sugar over the top. Cut a few vents along the top of the pop-tarts.

Readyforoven

Et voila! Bake in preheated 400F (about 200C) oven for 18-20 minutes, depending on the amount of sugar in the crust and many other factors. I'd recommend checking at the 15-min mark and continue to keep your eye on them, and take them out of the oven as soon as they are nicely golden brown and not too brown on the crimped edges.

Homemade Yoghurt

woman eating yogurtyoghurt (6K)


Yogurt takes a little bit of time to make. Not actual working time but time for it to sit and culture. Yogurt is a cultured product, much like cheese. It is a very easy and economical to make.

Before you begin there are a few things to make sure you have on hand and a few things to know and understand about the process. Most of what you need you will be able to find in the grocery store.

You need to begin with starter yogurt. Starter yogurt is yogurt that has been made with active live cultures; this is the friendly bacteria that will turn your milk into yogurt. You can buy a small container of yogurt at the grocery to use for this purpose. Make sure that the container says Made with live cultures or something of this nature. You want to buy plain yogurt, not flavored. Each time you make yogurt you will need some starter. You can use your own starter, but over time it looses its potency and your yogurt will not turn out. So I always begin with store bought yogurt. You can freeze your starter yogurt in ice cube trays so that it is convenient to have on hand.

As far as tools for making yogurt go, you will need a thermometer. A candy thermometer bought from the grocery store will work just fine. You will need a large pot to heat up your milk and then something to incubate your yogurt for about 12 hours. The temperature of the yogurt must stay between 90 and 110 degrees during this incubation time.

There are a variety of ways of maintaining this temperature. If you have a gas stove, putting your yogurt in the stove and leaving the pilot light on may be enough. Make sure you have a thermometer in the oven so you can keep an eye on the temperatures. If you have a stove that you can set at around 100 degrees, this works also. Another method that works is to use a small styrofoam ice chest. While you are making the yogurt fill up the ice chest with hot tap water. Right before you set the jars in the ice chest empty the water, place filled jars in the ice chest, and fill with 110 degree water up to the bottom edge of the lids. Put the cover on and place a blanket over this. After about 4 hours check to make sure the water is still the right temperature (between 90-110 degrees). If the water is cooling down, dump half of it out and replace with 110 degree water and cover again. Check every 1 1/2 hours or so to make sure the water is staying warm. If the temperature of your yogurt gets to high or to low then it will kill the culture. So it is important that during the incubation period that your temperature stays between 90 and 110 degrees.

yogurt2 (4K)

Homemade Yoghurt


by Crystal Miller

- 8 cups milk, cow or goat (I raise Nubian goats and use my own goat milk most often, but have made lots of yogurt with ordinary milk from the store)
- 1/3 cup powdered milk (this is optional but will make a thicker yogurt)
- 1/4 cup pure maple syrup, optional for sweetened yogurt
- 1/2 cup starter yogurt

Before you begin wash 2 quart-sized canning jars. If you want to use 4 pint-sized jars instead that would be fine too. Have the metal rings and lids ready to cover the jars when you are done.

Pour your milk into a large cooking pot. Heat the milk up to 185 degrees. Allow the milk to cool down to 110 degrees. The cooling can take a long time. If you want to speed the process up fill your sink with cold water and place the pot of hot milk in the water and stir and stir. The temperature drops fairly quickly this way, so make sure to have your thermometer handy to keep checking.

After you reach 110 degrees add the remaining ingredients and stir until everything is dissolved very well. Pour this mixture into your ready and waiting jars. Put the lids on and put them into what ever place you are planning to incubate and culture them. Leave them there for 10 to 12 hours. Try not to disturb the jars to much. When the yogurt is firm it is time to remove them and put them in the refrigerator to get nice and cold. Usually 12 to 24 hours. If you make and incubate the yogurt during the day it can refrigerate overnight and be ready for breakfast the next day.

If you would like flavored yogurt, just add fresh cut up fruit or a little bit of flavored jam when you are serving your yogurt.


yogurt3 (4K)

Yogurt (oven style)


Alternative method of yogurt making

Makes 1/2 gallon
1/2 gallon milk (I use fat free)
2 cups instant dry milk powder
1 cup sugar or your choice of sweetener
1 Tablespoon good vanilla (I use Mexican)
1 6-8 oz. container yogurt with active cultures (first batch after that save some of your own)
Thermometer
Large, heavy, pot
Electric stove with light or gas stove with non-auto pilot light. Can also use a heating pad/towel/and box to cover)

Place milk in pot and add dry milk powder. Stir well.

Heat milk to 180 degrees, stirring now and then so bottom doesn't burn

Fill sink with ice cold water and place pot insde sink, Add sugar and stir well. Cool down to 110-115 degrees. Add vanilla. Add yogurt and stir well.

Fill containers of your choice and seal. ( I use jelly canning jars) Place on cookie sheet or heat proof tray.

Heat oven to 110-115 and turn off. Turn on oven light.

Place yogurt in oven on upper rack and check oven periodically to make sure it stays between 110-115.

Yogurt will be "done" in 4-6 hours but you can let it incubate for up to 12 depending on how tart you like it and how much beneficial bacteria you wish it to have.

Serve plain or with any kind of fruit. Suggestions: Top with sliced bananas, peach or cherry pie filling, or stir in plain vanilla.

Home-made Hair Color? Why Not?!

I will say this straight off the bat: I am a hair color addict. Yeah, I admit it, and if it weren't for eyebrows I would have no idea what color my hair is really supposed to be. In my mind, hair is a blank canvas, just screaming to be clipped, altered, and, my favorite, painted.

But forget about the bottle-where's the fun in that?! Sure, you can purchase a pretty little package at the store and cross your fingers that the color you end up with is the same color the beautiful lady on the front is sporting, but after taking a cautious peek at your brassy orange it-was-supposed-to-be-golden-chestnut hues you want to maul the nearest head of hair within your reach.

The salon isn't much better, at least in my cheapo opinion. The cost of a dye job is quite literally more than the value of my car. And as fickle as I am, an ever-changing hairstyle like mine would certainly buy my colorist a new house within the year. Not for me. I like to fill my pockets with actual dollars, thank you very much.

My solution? Home-made hair color, my friend. Sure, I enjoy the odd hues of blue, black, purple, fushia, green, red, and every shade that can be created in between, but hey, who shouldn't? Don't worry though, there are plenty of tame home-made hair color treatments to suit everyone's tastes.

The funny thing is you would be surprised what passes for terrific, if temporary, hair dye that go beyond the juvenile basics, like kool-aid and food colouring. (Which, by the way, should tip you of as to how I accomplish every possible shade imaginable, including shades I haven't even named yet.)

For instance, beet juice, anyone? Yes, that red, staining, oddly sweet-smelling liquid that always finds its way onto your clothing is the very same stuff that always finds its way into my bottle of conditioner. I will tell you, when a soft red highlight is what you are seeking, this washable dye will make brunettes and darker-hued strands shine, while giving blondes and redheads a deeper hue. Gotta love it, and as a sweet bonus your hair gets to smell like tropical punch. What a fun, temporary fix for the inner hair rebel in anyone.


Lemon juice and tea are old standbys. For the honey-colored tresses these natural additives to hair are like gold. Just watch your hair sing with joy when the beautiful light streaks jump out into the sun to tease the world around you. Yeah, it sounds sappy, but when you can have beautiful highlights on the cheap and have it be healthier for your tresses on top of that, I can imagine if your hair could sing it would.

For those of you treating your hair to a good time on the rebellious side (not my point of view in reality but most of us think blue is a bit unconventional) keep your kool-aid packets handy. Forget the food coloring and go straight for the good stuff. Mind your skin, wear gloves, and let the streaking good times roll!!!
Healthy, home-made hair color for everybody!

Homemade Plastic

This is a quick and simple method for making your own general-purpose plastic. The constituent ingredients are milk and vinegar. That's it. The total cost is less than $10, possibly less than $5 if you can get a good deal.

The plastic is moldable, and has a consistency of soggy cheese (I certainly hope I never encounter cheese that's anything like this!). When all is said and done, it should take you about 10-15 minutes to make the plastic (less if you make a small amount), 10 minutes of cleanup, plus 2+ days to allow the plastic to dry. As always, your milage may vary.

As for the final product's strength and whatnot, I would classify it as "okay." If you roll it thin (as I did in this instructable), it can easily be snapped in half, though it will probably survive a small drop on to carpet. Thicker pieces seem to be more resilient against average abuses - no problem dropping on to carpet, and if it's thick enough, you wouldn't be able to snap it in half. A blow from a hammer or other such object would quickly shatter it, though.

All in all, I would say this is mostly useful for folks looking for a fast and dirt cheap alternative to much better products available to the average joe. It's definitely not for something that will be handled on a daily basis - good enough for light decor, not much else.

This is my first Instructable, so bear with. Constructive criticism is always welcome!
Homemade Plastic

To View All Steps on one page,
Go Pro Today!
step 1Ingredients & Utensils
This doesn't require anything fancy. Essential Items: Milk Vinegar Large Pot Larger Pot (needs to be the same size as the other, or larger). Spoon, preferably plastic or metal Strainer or Colander, the finer the better Stove or other item with which to simmer milk. Paper Towels, lots and lots of paper towels Handy, but not necessarily essential, items: Wax Paper (go…

step 2Heat it up
If you've never heated milk before, it's important to know that if you heat it too fast, it will start to burn on the bottom of the pot. To bring it to a simmer, it's best to keep the heat down to about 50-60%. I don't follow my own advice, and use full heat, because I don't want to wait. While the milk is heating, be sure to stir it occasionally, so it doesn't burn…

step 3Strain
Slowly pour the heated liquid through the colander and into the larger pot. Most of the chunks of casein will get caught. We pour slowly to avoid splashing the plastic-loaded liquid into the sink. Something tells me that chunks of this stuff in the drain is not a Good Thing(tm). Once you've poured it out (don't worry about what's left in the bottom, we'll get to that)…

step 4Sop up the excess
After you've strained all of the casein out of the liquid, you'll want to soak up some of the remaining juice in the mass on the wax paper. Use a few paper towels, and press gently on the casein. The liquid will spill out like squeezing a sponge. Be careful not to make it too dry, because it will become difficult to mold if it's too dry.

step 5Mold!
At this point, you're ready to do whatever you want with the plastic. It will take about two days to cure, but if you're using a mold where it cannot easily breathe, it will take longer. One thing to watch out for is that the casein will warp when it's drying, especially if you have it rolled out into a sheet. It's best to put a weight on it.


Why Make Homemade Items

O've always liked to make gadgets and gizmos that fill some need ... some useful (or not so useful) function. It started with the simple things that many kids make - slingshots, a simple bow and arrow, a toy boat. Occasionally more involved items such as a canoe and a dune buggy became trophies to add to my accomplishments.

Simple things appeal to me more than more costly homemade items. A project with a small amount of time invested seems more like entertainment. Projects that use up more time and money make me think I would be better off doing something else.

So now when I don't feel motivated to do more practical things I often turn to an idea about some device or other that I've wanted to try making but never got around to.

I can recall many such improvised devices that gave me much needed diversion from the grind of more practical endeavors. Time spent earnestly involved in the creation of something designed and made with ones own ingenuity can be quite enjoyable. Each project gives me something to be proud of and more evidence that I am capable of more than tediously repeating over and over what I have done too many times before.

Ideas for things to make come from many places. Most often the idea comes from some need. I do a lot of keying of text using a computer keyboard. I tend to keep the room temperature a bit cool, cool enough that my hands become uncomfortable. I ended up rigging a length of electrical heating tape wound in a large coil-shape to surround the keyboard. Tying the heat tape to a large piece of cardboard keeps it in place. It does a nice job of keeping my hands warm. I can leave the room temperature set where I want it. As far as I know, you can't buy anything like that.

A project can inspire wonder about the physical world and wonder about our abilities to manipulate what is around us. Our capacity to wonder and appreciate increases as we build and invent. Creation of an improvised device adds to awareness and reverence for what the world has to offer.

As we build and invent, we add to our awareness of what is around us. We begin to understand that even simple things are complex. This insight gives us appreciation for the physical world and our abilities to manipulate what is around us.

Creative and rational abilities are used together to design and make a homemade gizmo. The more often the two abililities are used together, the more powerful the combination becomes. A strong partnership of the rational and creative minds increases a person's ability to produce and enjoy life.

It is fun and satisfying to conjure up and build simple devices. Those created items command more appreciation than more casually acquired, purchased items. And it feels good proving that imagination and ingenuity can make life better. Having witnessed first-hand the process of invention, we wonder what other things we can achieve.

Top 09 Chicken Recipes

So, here are my 10 favorite chicken recipes from this site.

  1. Chicken Parmesan Fingers over Garlic Spaghetti
  2. Honey Chicken Over Veggie Ricep3154149
  3. Deconstructed Broccoli & Cheese Stuffed Chicken Breastsp3224290
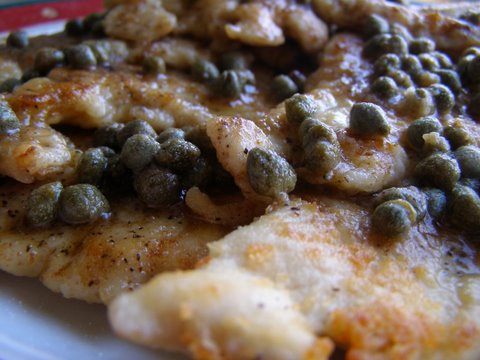
  4. Chicken with Brown Butter & Caper Saucep3244338
  5. Blackened Chicken with Cajun Alfredo Sauce
  6. Rodeo Chicken Sandwiches
  7. Buffalo Chicken Spaghetti
  8. Deviled Chicken
  9. Cider Vinegar Chicken over Smashed Red Potatoesp6127218

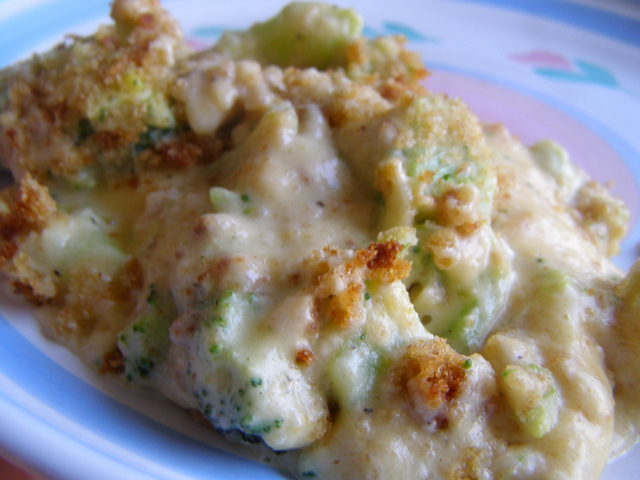
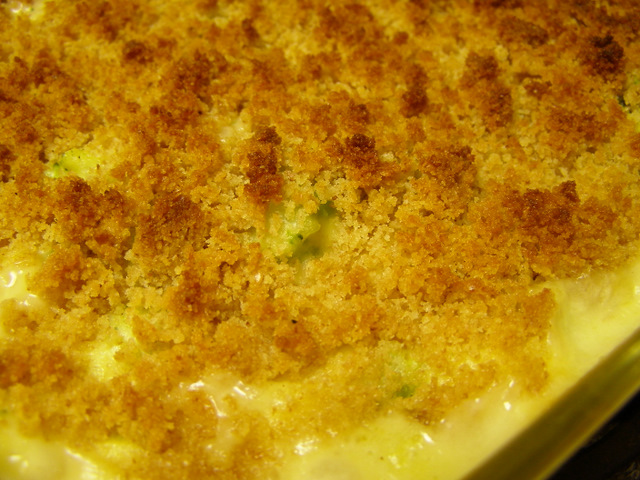
Deconstructed Broccoli & Cheese Stuffed Chicken Breasts

The presentation is great. But when I’m not worried about presentation, I take the easy way out. Here’s how I do it and it tastes delicious without any of the fuss.

p3154149

Deconstructed Broccoli & Cheese Stuffed Chicken Breasts

  • 1 lb. boneless, skinless chicken breasts
  • Salt & pepper, to taste
  • 2 T. butter or margarine
  • 2 T. flour
  • 1 1/4 c. milk
  • 1 1/2 c. cheddar cheese, cubed or shredded
  • 2 c. frozen broccoli
  • 1/2 t. thyme
  • 2 T. butter or margarine
  • 1 c. breadcrumbs

1. Season chicken with salt and pepper. Place in small casserole dish (8×8 or 9×9).

2. In a small saucepan, melt 2 T. butter or margarine over medium heat. Stir in flour and cook for 2 minutes. Whisk in milk, bring to a boil and cook until thickened to gravy consistency. Remove from heat. Stir in cheese until melted. Add the broccoli. Season with salt, pepper and thyme. Pour over chicken.

3. Bake at 350 degrees for 30 minutes.

p3154138

4. Melt 2 T. butter or margarine and combine with breadcrumbs. Sprinkle over chicken and return to the oven. Bake for 5-10 minutes, or until browned and chicken is fully cooked.p3154149

Smoky Chicken Skillet

Frozen vegetables are a great bargain, they’re just as nutritious as the fresh veggies and they are easy to stock up on whenever there is a good sale.

Lately, I have been enjoying trying out lots of different frozen vegetable blends (the ones that are just the veggies, not ones with added seasonings or sauces). California blend (broccoli, cauliflower and carrots) has been a favorite for a long time because it’s so versatile. As I work my way through all the different blends that look like a good fit for our family, I try to come up with a new recipe or a variation on an old favorite that uses that blend to its best purposes.

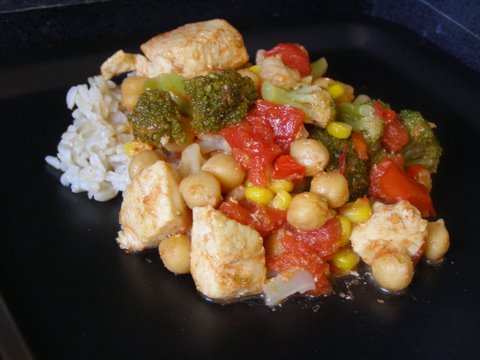
That was what I did when I came across a Mexican blend that included broccoli, cauliflower, corn and red peppers. The blend worked well in this dish full of chicken and beans with a decidedly smoky flavor.

Smoky Chicken Skillet

  • 2 T. olive oil
  • 1/4 t. crushed red pepper flakes
  • 1 lb. boneless, skinless chicken breasts, cubed
  • Salt and pepper, to taste
  • 1 bag Mexican vegetable blend (broccoli, cauliflower, corn and red peppers)
  • 1 can garbanzo beans or 1 dry, cooked garbanzo beans, rinsed and drained
  • 1 15 oz. can diced tomatoes
  • 1/2 c. chicken stock or water
  • 2 t. cumin
  • 1 t. paprika
  • 1 t. salt
  • 1/2 t. black pepper
  • 1/8 t. cayenne pepper, optional

1. Heat olive oil in a large skillet over medium heat. Add crushed red pepper flakes. Season chicken with salt and pepper and add to skillet. Cook until chicken is browned on all sides. Add veggies and cook for 3 minutes.

2. Stir in remaining ingredients, bring to a slow boil and simmer for 10-15 minutes. Serve over rice or pasta.

I used garbanzo beans because those are a favorite with the kids, but you could definitely replace them with black beans or kidney beans. You could also leave them out all together, if you want. Or, you could double the amount of beans and leave the chicken out for a vegetarian option.

Tomato & Garlic Chicken & Veggies

They are definitely at the top of my list when stocking the freezer or when I’m in a hurry and need a dinner that comes together quickly.

For awhile I thought I had maxed out all my options for this type of dish. I just couldn’t come up with anything new on my own and I wasn’t finding much inspiration in magazines or cookbooks. I figured we’d just have to be satisfied with our usual repertoire of about 10 different versatile sauces that I knew we all loved.

Until today that is. I was planning to make chicken cacciatore for our dinner, but it just wasn’t sounding as good to me as it usually does. So I thought I’d see if I could take some of the basics of that dish and create something a little different. And it worked!

I am thrilled with this new addition to my sauce mainstays. It is similar to my traditional cacciatore, but different enough that I’ll consider it as a unique option.

Tomato & Garlic Chicken & Veggies

  • 2 T. olive oil
  • 1 lb. chicken breasts, cubed
  • Salt and pepper, to taste
  • 1/4 t. Crushed red pepper flakes
  • 6 cloves garlic, minced
  • 1/2 lb. carrots, peeled and sliced
  • 1 15 oz. can diced tomatoes
  • 1 15 oz. can tomato sauce
  • 1 1/2 c. frozen peas
  • 1 t. Italian seasoning
  • 1/8 t. allspice

1. Heat olive oil in a large skillet and season chicken with salt and pepper to taste. Add chicken to hot oil and cook for 3-5 minutes, until it’s just beginning to brown. Add crushed red pepper flakes, garlic and carrots to skillet. Cook for 5 more minutes.

2. Add remaining ingredients and bring to a boil. Cover, reduce heat and simmer until chicken is fully cooked, at least 15 minutes or longer to boost the flavor, if desired.

This was great over noodles and it would also be great over mashed potatoes or rice. I think it would also be perfect thinned with a few cups of chicken stock and eaten as a soup.

Pineapple Chicken

This dish changed a lot throughout the preparation process. I originally had envisioned a pineapple-based glaze over chicken breasts with pineapple chunks on top. Then I decided I wanted to do more of a saucy dish with chicken chunks instead of whole breasts. So I went for a Chinese style sauce. It turned out wonderfully. We all really enjoyed it served with the baked brown rice balls.p4214788

Pineapple Chicken

  • 2 T. Olive oil
  • 1 lb. boneless, skinless chicken breasts or thighs
  • 1 green pepper, diced
  • 1 can pineapple chunks or tidbits, drained with 1/2 c. juice reserved
  • 1 t. crushed red pepper flakes
  • 1/2 t. dried ginger (or 1 T. freshly grated ginger)
  • 1/3 c. teriyaki sauce
  • 1/3 c. chicken stock
  • 1 T. cornstarch mixed with 1 T. water

1. In a large skillet, heat olive oil. Add chicken and brown on both sides, about 3-4 minutes each. Cover skillet and cook for 10 minutes more. (If chicken is not fully cooked all the way, that’s okay. It will have a chance to finish cooking later.) Remove chicken from skillet and set aside.

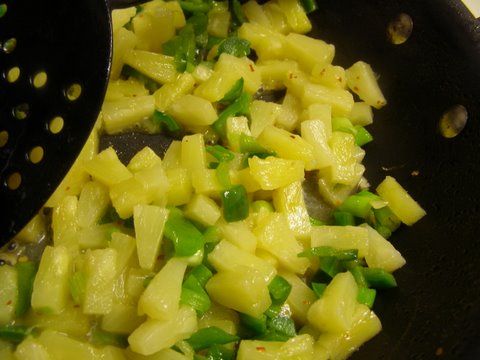
2. Add diced green peppers, pineapple, crushed red pepper and ginger. Cook about 5 minutes. While cooking, cut the chicken into chunks.

p4214769

3. Add reserved pineapple juice, teriyaki sauce and chicken sauce. Bring to a boil, return chicken to skillet, reduce heat, cover and simmer for at least an additional 15 minutes or up to a few hours.

4. About 10 minutes before serving, remove cover from skillet and bring sauce back to a boil. Stir in cornstarch/water mixture and continue boiling until sauce is desired thickness.

Chicken Cacciatore

In our house, there are two things that always go over big at dinner time – spaghetti and chicken. So with chicken cacciatore, we get the best of both worlds.

The bulk of the meal freezes perfectly, and it works in a freezer bag, so it hardly takes up any room. All that will need to be done before dinner is to boil some pasta. Easy and delicious!Chicken Cacciatore

  • 3 T. Extra-virgin olive oil
  • 1/2 small onion, diced
  • 1 green pepper, diced
  • 3 carrots, diced
  • 2 cloves garlic, diced
  • 1/2 t. crushed red pepper flakes
  • 2 t. Italian seasoning
  • 1 t. salt
  • 1 lb. boneless, skinless chicken pieces (breasts or thighs)
  • 2 cans crushed tomatoes
  • 1/2 c. chicken stock
1. Heat olive oil in a large skillet over medium heat. Add onion, green pepper, carrots and garlic. Cook for about 5 minutes, until veggies are cooked but still a little crispy. Stir in seasonings.
2. Add chicken to the skillet. Cover with tomatoes and chicken stock. Bring to a slow boil, cover and simmer at least 30 minutes. The chicken should be fully cooked by this point, but a longer simmer time will result in more flavor. Before serving, you can cut the chicken into bite-sized pieces if desired. Serve over spaghetti.

The Benefit of Cooking All Things Homemade

Some simple commentary by little 'ol me. I was watching Oprah the other day, yes the Chef Maven watches Oprah, not all the time mind you, but sometimes - but that is not the point! This particular show had Dr. Oz (which btw I cannot stand that he wears his scrubs on the show - I wish he would wear normal clothes - anyhoooo, I digress), in which Dr. Oz tested the audience on their health and the aging process. Most people scored quite poorly, meaning they were aging faster than their actual years. Yikes!

One lucky women had received an 'exceptional' rating on her rate of aging. When asked for her secrets, answers were that she exercised nearly every day and the point I want to make here, she mentioned that she 'made almost everything she ate'. This particular thought struck me, not only in awe, since so many of us can easily make reservations or order take out in some form or another; but what would it take to really make everything you eat by hand?

When I first heard about 'slow food' (more about that later) I learned I was already practicing good 'slow food' habits - who knew!? And if it was helping this women to age slowly, and slower in fact than her actual years, well I decided that I have got to make sure I am on this band wagon and ensure I was eating mostly foods that I made at home.

Now I might be luckier than most in that I know my way around the kitchen, but my boyfriend and I had recently decided to watch our budget very carefully. We discussed we shouldn't go out to eat but twice a month if that in order to save money. We already knew that almost always the food was better at home than in any restaurant.

One fact is this, eating home prepared food from scratch not only ensures you know what ingredients go into every meal or bite of food, you can make sure the ingredients are at their freshest and most importantly, making food at home is always cheaper and far more affordable than pre-made food, let alone far healthier for you and your family.

Now I am not talking about those 'Banquet Frozen Meals' which I see on sale sometime for $2.00 a box. But what are you really getting for that box? OK, I know convenience - but for the most part, those boxed frozen foods taste best when heated up in an oven versus the microwave. So if you are already using the oven for at least 20 minutes - you could have cooked a far more nutritional meal without the added additives.

I have heard horrid stories that after we die, the time it takes for our bodies to decompose is far longer than it used to be - and the reason for this? All the added additives we have in our foods that we have digested in our lifetimes somehow sticks with us. Now isn't that an icky thought? I am seriously thinking of donating anything than can be donated of my body once I go and then being cremated and sprinkled around my favorite spots. But I think that this idea should be in another post, huh?!

Again, since time is an issue for so many of workers, let alone keeping the home front organized and cleaned, whose got time to cook? Well, when it is your health at stake and aging quite frankly is an issue with you, no better way to help yourself and you family by starting to cook more at home.

Being organized certainly helps as does a well stocked pantry - both which should be a priority if you are thinking of cooking more at home. The internet is full of websites (including many of mine, naturally) which will provide you with interesting recipes. Many sites offer you the chance to list a few ingredients you may have on hand and out pops several recipes for you to try.

So this week I have done just that - made all things homemade that I and my boyfriend have been enjoying. From iced tea, to lunches which included a tomato spinach pie or eggs special to diners which included linguine with meat sauce, homemade salad dressings, pesto and even an interesting homemade lavender honey bread just to name a few. If you want to see any of those recipes, simply surf on over to my Dinner and Jam Blog and do yourself one better and sign up to receive the recipes in your email box once or twice a week - or depending upon how busy I am in writing out my recipes.

There are somethings that I just won't do unless under very special occasions, make from scratch, such as homemade orange juice (the price of enough oranges to make one cup of OJ is simply ridiculous) - nor would I go out of my way to make butter, mill my own flour, etc. You obviously need to make your own choices here people, but by using as much from scratch products and ingredients in your own home cooked meals, you will find that they really do taste a lot better than something heated up from a frozen box, are certainly more affordable than going out to dinner, and more importantly besides having good 'slow food' habits - you are spending wonderful time with your family and friends.

This is a wonderful way to get our kids into the kitchen too, to help prepare many of the foods - how the heck will they ever learn to cook if they don't help out in the kitchen and be a part of the family? And if you prepare and organize yourself, you will find that a roast chicken for example can turn into at least 2 other great meals such as chicken salad and chicken tettrazinni to name a few out of my head - and no one will be able to tell it was leftover food!

OK So you want to know about Slow Food. I will share more about that in another post/article, but here are the basics:

Here is an excerpt from the SlowFoodUSA.com site to help you briefly understand what Slow Food is all about:

"Living the slow life with food as the focus is as rewarding as it is easy, and it can be done daily by each one of us. Ultimately, it is about pleasure and taste, knowledge and choice. Once we begin to take an interest in the enjoyment of food, and in finding out where our food comes from, we can begin to see the effects of these choices. When we shorten the distance-both literal and figurative-that our food travels to get to us, we are participating in the Slow Food movement. Slow Food is about coming together as a food community-connecting producers and co-producers, coming together on the farm, in the market, and at the table-to create and enjoy food that is good, clean and fair."

So get cooking I say, learn more about 'slow food' and age slowly and gracefully!

And remember: the benefit for making things all homemade? It's more affordable, you are practicing great 'slow food' methods, the food is tastier and far healthier for you and your family! And you are even using those pots and pans you thought you would never use!


Homemade Chicken “Things”

Call them what you want…nuggets, fingers, crispers. The name doesn’t matter nearly as much as the taste. And these homemade chicken “things” taste fantastic!

p4054571Homemade Chicken “Things”

  • 3 – 4 lbs. boneless, skinless chicken breasts
  • 1 1/2 c. complete (just add water) pancake mix
  • 3/4 – 1 c. water
  • 2 T. hot sauce
  • 2 t. salt and black pepper
  • Oil for frying

1. Trim chicken breasts and cut into desired size nuggets or fingers.

2. In a large bowl whisk together pancake mix, 3/4 c. water, hot sauce and salt & pepper. Add more water to thin if needed. (Note: You want the mix to be a little thinner than you would for making pancakes, but not very much.)

3. Heat oil in a fryer or in a medium-sized pot. Add chicken pieces to the batter and stir to coat completely.

4. When oil is hot, use a slotted spoon to transfer chicken from the batter to the oil. Depending on the size of chicken pieces, only cook about 5 to 10 pieces at a time.Cook about 3 – 4 minutes per side, until batter is browned and chicken is completely cooked.p4054576Some Tips and Notes:

  • This recipe makes a lot and I did that on purpose. The process takes some effort and time so I would rather invest all that time at once and be rewarded with some extras for the freezer. (We will get 3 meals out of this.)
  • Yes, these do freeze very well. Freeze in a single layer in a freezer bag. To reheat, place frozen chicken nuggets on a cookie sheet and bake at 350 degrees for about 15 minutes, until fully warmed.
  • These chicken nuggets are similar to the “chicken crispers” you can get at Chili’s. They are crispy but not crunchy.
  • I do not have a thermometer that I use in my kitchen. I judge the heat of my oil with the handle of a wooden spoon. When bubbles form around the handle, the oil is hot enough. If the chicken starts browning too quickly, I turn the heat down a little.
  • This is a super versatile item to have on hand in your freezer. They taste great as is or as part of a meal. I have a great recipe for that coming up later this week.

Incredible Homemade Halloween Costumes

Giant Robot Wolf Mech Costume

What makes a giant robot costume giant? Well for one it doesn't hurt to make a costume that's over 9 feet tall using stilts. Otherwise you just have to create the illusion that it's giant by using a tiny pilot in the head of the costume complete with moving control levers. This guy could have made a robot costume and stopped there, but instead he made a 9'4" tall "giant" mech wolf with glowing red eyes and a moving pilot inside the mouth. It probably goes without saying that you're not going to be able to whip one of these up before Halloween as it took the original creator over 5 months to construct. Source

Zoltar Fortune Teller Machine Costume

We predict that you'll see a fortune teller costume or two this Halloween, but it's very doubtful that you'll see one as creative as this Zoltar Fortune Teller Machine Costume. Riding along in his wheeled wood and glass cabinet mounted to a Segway, this mustached mysterioso has everything he needs to predict the future including a light up crystal ball and of course a coin slot. Source

Gaping Hole Halloween Costume

You don't have to know much about sewing or papier-mâché for this particular costume, but you'll have to know a thing or two about tech. The Gaping Hole Halloween costume creates the illusion that you're missing a big chunk out of your torso. The LCD DVD player in the front displays a live feed of the digital camera strapped to your back, giving the appearance to anyone who's looking directly at you that you've got a huge gaping hole in your stomach. It's the kind of costume most people joke about making but don't have the wherewithal to accomplish themselves. Source

Original Alien Costume

Believe it or not this extremely unique and elaborate Alien costume was made quickly on a budget. Even though some simple items were used to create this original alien character it's really about how all the pieces come together that make this such a cool costume. The stilts and spikes really make this creature look and feel menacing and dangerous, which comes across even more when you see the wearer move. Check out the video of this alien in action at Will Segerman's blog. Source

Silent Hill Siam Cosplay

Couples Costumes instantly make a costume idea feel more thought out, but there isn't a single couples costume idea that we could think of that tops the Silent Hill Siam costume. Unlike pretty much any other couples costume idea (other than perhaps a horse) you really can't part from your partner once you're dressed up. In this over the top horror game inspired costume the girl is strapped to the back of the guy and unable to move anything other than her legs. We're not sure what's more difficult... getting into the costume or walking around once in it. Source

Dragon Costume with Movable Wings

Most folks would consider a dragon costume with stiff wings to be pretty elaborate, but hardcore costume enthusiasts wouldn't settle for anything less than spreadable wings. Costume designer Lilleah West engineered two different styles of moving wings for complex dragon costumes. The first style works by pulling on strings and the second one uses latches to hold them in place. Both have their own sets of pros and cons, but either way you go they're awesome. Source

Heidi Klum's Hindu Goddess Costume

If you're going to offend Indian religious leaders you may as well go all out. Heidi Klum never meant to offend with her outrageous Kali costume, but she was drawn to the idea because the Indian Goddess is depicted in such a gruesome way... perfect for Halloween. Heidi's costume surely missed no detail, with heads skulls and fingers draped over her as she wields an array of weapons. Even still the most noticeable features are the extra arms, blue skin and big hair. Source

Star Wars Hovering Boba Fett Costume

Boba Fett costumes have been done, but this one takes the idea to a new heights. This clever costume makes it look as though the Mandalorian bounty hunter is rising off the ground using a jet pack with his legs dangling as he lifts off. His real legs are of course concealed beneath the fake flames since real jet packs ain't cheap. If the details in the costume weren't dedication enough the wearer has rollerblades on which adds to the illusion that he's effortlessly hovering. Source

Transforming Bumble Bee Camaro Costume

We really don't care how awesome any other Bumble Bee Transformers costume looks... if it doesn't actually transform into a Camaro then it's just not that impressive. Impossible to make a working transformers costume you say? Clearly you never saw the actual transforming Bumble Bee costume that converts from robot to car in just a few seconds as the wearer crouches down. Source

Ripley Aliens Power Loader Costume

No, this wasn't designed for some kind of Aliens convention— it was made purely for Halloween. The creator designed it for his girlfriend's Ripley costume because apparently the perm wouldn't be recognizable enough. This elaborate tribute to the 80s sci-fi film measures 8 feet tall and took 180 hours to make. For all intents and purposes it's functional in that you can move in it and grab things.

Top 10 Homemade Versions of Things We Love

Making your own versions of great food and clever gadgets is already rewarding, and if you play your cards right, the homemade route also comes with serious bragging rights. These 10 economical homemade creations—epicurean and electrical—should inspire some well-deserved praise.

10. Ice cream creations

The moment you discover you're out of ice cream, at that crucial just-enough-room-left moment, is a very bad moment, indeed. You can make a substitute in about five minutes, or forge a vanilla bean substitute if it's more your speed. For more fixes and crafty dessert ideas, try our favorite homemade ice cream recipes.

9. Pizza ovens

There's an entire realm of new restaurants opening on the premise that pizza baked in wood-fired ovens tastes great, and is worth the extra time and money over your favorite napkin-soaking corner joint. We're of the mind that you shouldn't have to drop a C-note to feed a family with great pizza. We started our obsession with a temporary bricks-in-oven setup, then moved on to a small but efficient backyard model. We hit our apex with stomachs growling by glimpsing at a backyard, concrete-seated pompeii oven, and then brought it all back home with an oven you can build in one afternoon. Pizza—it inspires our readers, and makes us hunt for ever more tasty step-by-step pictures.

8. DTV Antenna

Okay, we don't actually love collections of specially-spaced wire connected by coaxial cable, but we do love the free, often high-definition television content that's floating through the air. It is, after all, the missing link between a cable-free life and "What about sports and events?" We really dislike paying $40 or more for a really crappy model with a six-foot cord, though. That's why this homemade version, which you can run as much cord as you want to and place anywhere, is so appealing. Judging from our commenters and own experience, it's also a lot more successful at grabbing channels from multiple stations, which is reason enough to dismantle some wire hangers and grab a two-by-four. (Original post)

7. Ginger ale and other sodas

There are only so many brands of the fizzy stuff at your grocer, and it's all about the same price. Wanna jazz up your soft drink selection? Make your own home-brewed ginger ale and other sodas, tweaking the flavor profile, sugar amounts, and carbonation to your liking. We started down this road with a ginger ale made from real ginger, but picked up a ginger-syrup-based version and a smaller batch carbonated with yeast. Finally, we heeded Howcast's advice on making any kind of soda yourself, yielding two 2L bottles that keep for up to a month. Needless to say, all of this stuff tastes how you want it, and might even go well with the harder stuff.

6. Sports drink

Not that there's anything wrong with the neon-colored stuff, but concocting your own is cheaper, slightly more natural, and amenable to having the flu and really not wanting to drive to the drug store. We've recently seen fairly well-tested recipes from the New York Times' Well blog, and WebMD also has its mix. (Original posts: first, second).

5. Sun jars

Jason dug the idea of solar-powered backyard lights, but not the looks of them. So he read through this Instructables tutorial, picked up on some of the commenters' suggestions, and added a few of his own ideas, like DIY frosting, and came up with his own mason-style sun jars. They can be any color you please, you can hack together as many as you need, and your deck doesn't look like part of a home improvement store flyer illustration.

4. Shake Shack burgers and crispy fries

Lots of people love the burgers from NYC's Shake Shack, enough so to put up with rather sizable lines. Burger researcher extraordinaire J. Kenji Lopez-Alt went to the trouble of reverse engineering their recipe, right down to the smash-and-scrape griddle technique. For the natural accompaniment, soak and fry some potato wedges for unbeatable French fries. Photo by J. Kenji Lopez-Alt.(Original posts: burgers, fries).

3. Home theater PCs

They're not exactly something you can pick up at any old electronics store, but TV-attached PCs are coming into their own. There's the upcoming Boxee box, the Popcorn Hour, and a number of HD TVs arriving with streaming capabilities built in. If you'd like a bit more flexibility with your media, both downloaded and streamed, it's not too hard to set up your own little media computer that fits snugly into your home theater setup. Adam's silent, standalone XBMC-based setup is a super-slim little box that has just enough oomph to stream videos, and runs about $200. Me, I sprung for a cheap but powerful Boxee media center, boasting a spacious hard drive, 2 GB of memory, and the same kind of powerful graphics chip.

2. Kentucky Fried Chicken

Even if you know the Colonel's "11 herbs and spices"—and one of them appears to be a heavy dose of monosodium glutamate—it's hard to replicate the high-pressure deep fryer results of actual KFC. That didn't stop Tim Hayward and readers of his Word of Mouth blog from crowd-sourcing the best possible KFC stand-in. His post also lists the spice mixture from America's Most Wanted Recipes, so you can get in on that "facepunch" MSG factor if you'd like. (Original post).

1. Hackintosh running Snow Leopard

The Apple Tax—the difference between a Mac's hardware costs and what the Cupertino company charges—is steep, but you can endlessly argue its justification. If you don't want to pay it, or would rather get a bit more choice in your hardware peripherals, you can build a system and install Mac OS X Snow Leopard on it. Adam's chosen hardware setup is how he can (mostly) assure success with the process, but by crafting your own "Hackintosh," you get a choice of case, memory amount, processor speed, and other factors normally left to the whims of yearly inventory updates.

Thank You

Thanks for visiting my blog.Now kindly thanks the publisher by clicking any (ads) available in the blog.You can use My Google Search Engine as your default search engine.Add Comments to my blog posts and share it via different social networks. Mention the flaws left in posts and let me able to better my blog. Moreover,You can suggest me some related links to my blog posts.Bookmark it,soon you will need it again.I will be personally thankful to you.